Autorun results
Version 2.7
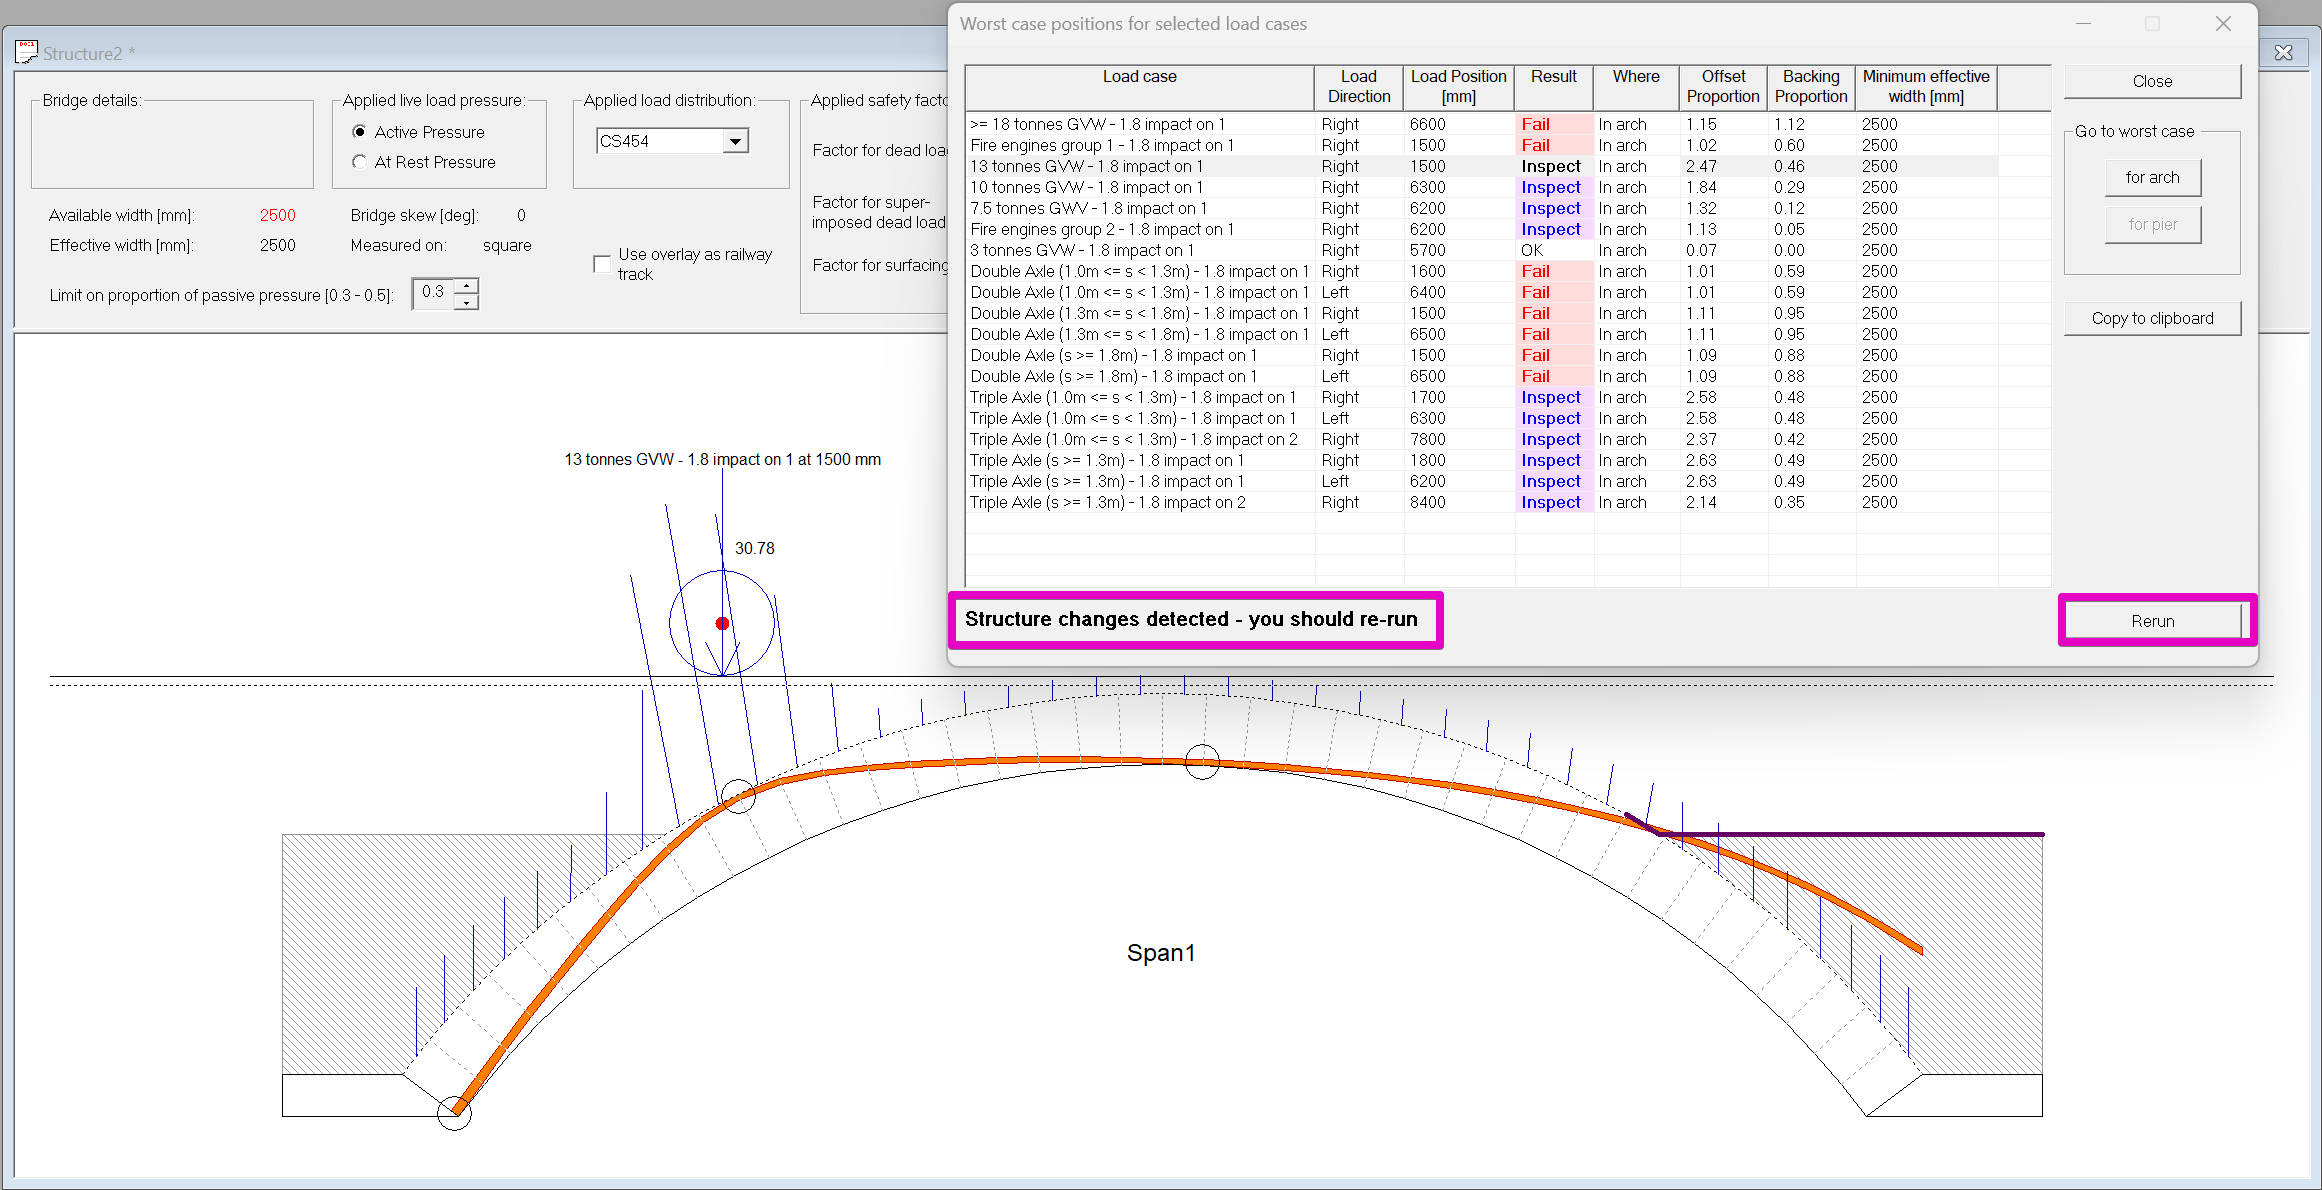
The autorun results dialog for Archie-M 2.7 looks like this:
Important functionality
- Double clicking on any row will update the bridge view to match, applying the relevant load at the worst case position.
- The "Go to worst case for arch/for pier" buttons will select the overall worst case, and show it in the graphical bridge view.
- "Copy to clipboard" copies the results table in tab separated format. This should paste into cells in Microsoft Excel.
- The dialog remains on top while it is open, but you can still interact with the model, including modifying it.
- The "Rerun" button will appear if the model is modified while the dialog is open. Clicking it will re-run the same set of loads and update the results table.
Contents of the table
Load case
The load case name as defined in the .ldf load file.
Note that the family and group names are not shown. Bear this in mined when defining custom loads. The load case name must be complete.
Load direction
When loads are asymmetrical (such as when one axle of a bogie has an increased impact load), they will be run in both directions. Symmetrical loads are only run in one direction.
Asymmetrical loads will appear twice in the table.
Load position
The x position of the load in the model coordinate system.
For a single span bridge where the left hand side is at 0,0, the load position is the offset from the left springing.
Where
For single span bridge models, this field will always contain "In arch" and can be ignored.
For multi-span bridges, for each load, two lines are added to the autorun table. One reports the worst load position according to the offset proportion in any arch in the model. The second reports the worst load position according to the thrust offset in a pier.
See the page on Multi-span viaducts for more.
Result
A result is reported for each line. The results are colour coded.
The possible results depend on whether the line is "In arch" or "In pier".
When "Where" is "In arch" (all rows for single span models, every second row for multi-span models), the possible results are:
- OK - the zone of thrust remains entirely within the arch ring.
- Inspect - only used for bridge models with backing defined, this indicates that the zone of thrust exits the arch ring but does not escape the masonry backing. "Inspect" is an instruction to the user to examine the case and judge whether the situation depicted is acceptable.
- Fail - the zone of thrust escapes the masonry (ring or backing) into soil fill, or another condition arises that indicates failure (no solution to the thrust is possible or tension is found at a radial joint).
For multi-span bridges, the other rows are "In pier". In these rows, the possible results are:
- OK - the thrust remains within the masonry in all piers.
- Adjust - the thrust in one or more piers escapes the pier masonry. Manual thrust adjustment is needed to complete the assessment. See the page on Multi-span viaducts for more.
[Maximum] Offset proportion
The tabular results give an offset proportion at each arch segment boundary. This is the position of the outer edge of the zone of thrust as a proportion of the ring thickness (see the page on tabular results for details). A value of 1.0 indicates that the zone of thrust just touches the extrados; a value greater than one indicates that the zone of thrust goes out of the arch ring.
The autorun table reports the largest offset proportion at a segment at or outside the intrados hinges. For multi-span models, it reports the worst value across all arches in the model.
For models with no backing,
- The worst case load position is exactly the position that generates the largest maximum offset proportion.
- A maximum offset proportion of greater than 1.0 is a failure.
[Maximum] Backing proportion
New in 2.7. The equivalent of the offset proportion when the thrust escapes into the backing.
Backing proportion is only reported (and only relevant) if the bridge model has backing defined.
The backing is divided into vertical strips. When a model has backing, and the thrust runs outside the arch ring, the thrust calculation is modified to find the thrust position on these vertical lines.
The backing proportion is the ratio of the offset from the bottom of backing (i.e. the arch extrados) to the upper edge of the zone of thrust to the backing height at that location. The autorun table reports the largest value across the bridge.
A value of 1.0 means that the thrust just touches the top of backing. A value greater than 1.0 means that the thrust exits the top of backing into the fill.
For models with backing, a failure can occur because:
- The thrust exits the arch ring into fill where there is no backing.
- The thrust exits the top of the backing (maximum backing offset > 1.0).
Both conditions might exist with the load at different positions. Archie-M considers the first case strictly worse than the second.
The maximum offset proportion reported in the Autorun table is the maximum anywhere, not just at segment boundaries where there is no backing present.
Minimum effective width
Archie-M calculates the transverse distribution (effective width) for each axle. The value given here is the smallest width over all of the axles for this load, with the load at the critical position.
For further information on transverse distribution, see Available width, effective width, and transverse distribution.
Versions 2.6 and before
Versions 2.5.1 and before are obsolete and cannot be supported. Upgrading from version 2.6 to 2.7 is strongly recommended (see Archie-M 2.7 release notes).
In 2.5.1 and 2.6, Archie-M only reported "Pass" or "Fail" for bridges with no backing. For bridges with backing, the QA RESULT column simply duplicated what was shown in the "Offset Proportion" column. The intention was that users should inspect the results to decide if the thrust path could be accepted.
If you double click on any row in the table, the load will be moved to that position and you can then compare the value (in this case 1.38) with the offset in the tabular (intermediate) data showing behind in this screen image. The ring is 600mm the maximum offset 830mm, so the "Offset proportion" is 830/600.

In this case, there is actually backing 1m deep and the real critical point is at the second block up:

So it is still a fail, but the actual factor is 705/600 or 1.18.
Document history
- 2023 Version relating to changes in 2.5.1
- 2026-01-20 Updated for version 2.7